背景
最近开发过程中遇到了需要文件相关的转化,基于此,通过一篇文章梳理各个文件对象之间的关系。
文件对象
ArrayBuffer
ArrayBuffer 是通用的、固定长度的原始二进制数据缓冲区,它是一个字节数组,在其他语言中也被称为 byte array
例如 创建长度为 8 个字节的 ArrayBuffer
const buffer = new ArrayBuffer(8);

console.log(buffer.byteLength); // 8
const buffer = new ArrayBuffer(8);
console.log(buffer.byteLength); // 8
不可读写,需要通过 类型数组对象(TypedArray) 或者 DataView 进行写操作
TypedArray
因为 ArrayBuffer 不可操作,一般会将 ArrayBuffer 转化为 TypedArray 对象 (可读写)
TypedArray 是一个底层二进制缓冲区的一个类数组视图
TypedArray 本身是一个接口,有很多实现如 Int8Array、Uint8Array、Int16Array、Uint16Array
| 类型 | 单个元素值范围 | 单元素大小(bytes) | 描述 |
|---|---|---|---|
| Int8Array | -128 ~ 127 | 1 | 8 位二进制有符号整数 |
| Uint8Array | 0 ~ 255 | 1 | 8 位无符号整数 |
| Int16Array | -32768 ~ 32767 | 2 | 16 位二进制有符号整数 |
| Uint16Array | 0 ~ 65535 | 2 | 16 位无符号整数 |
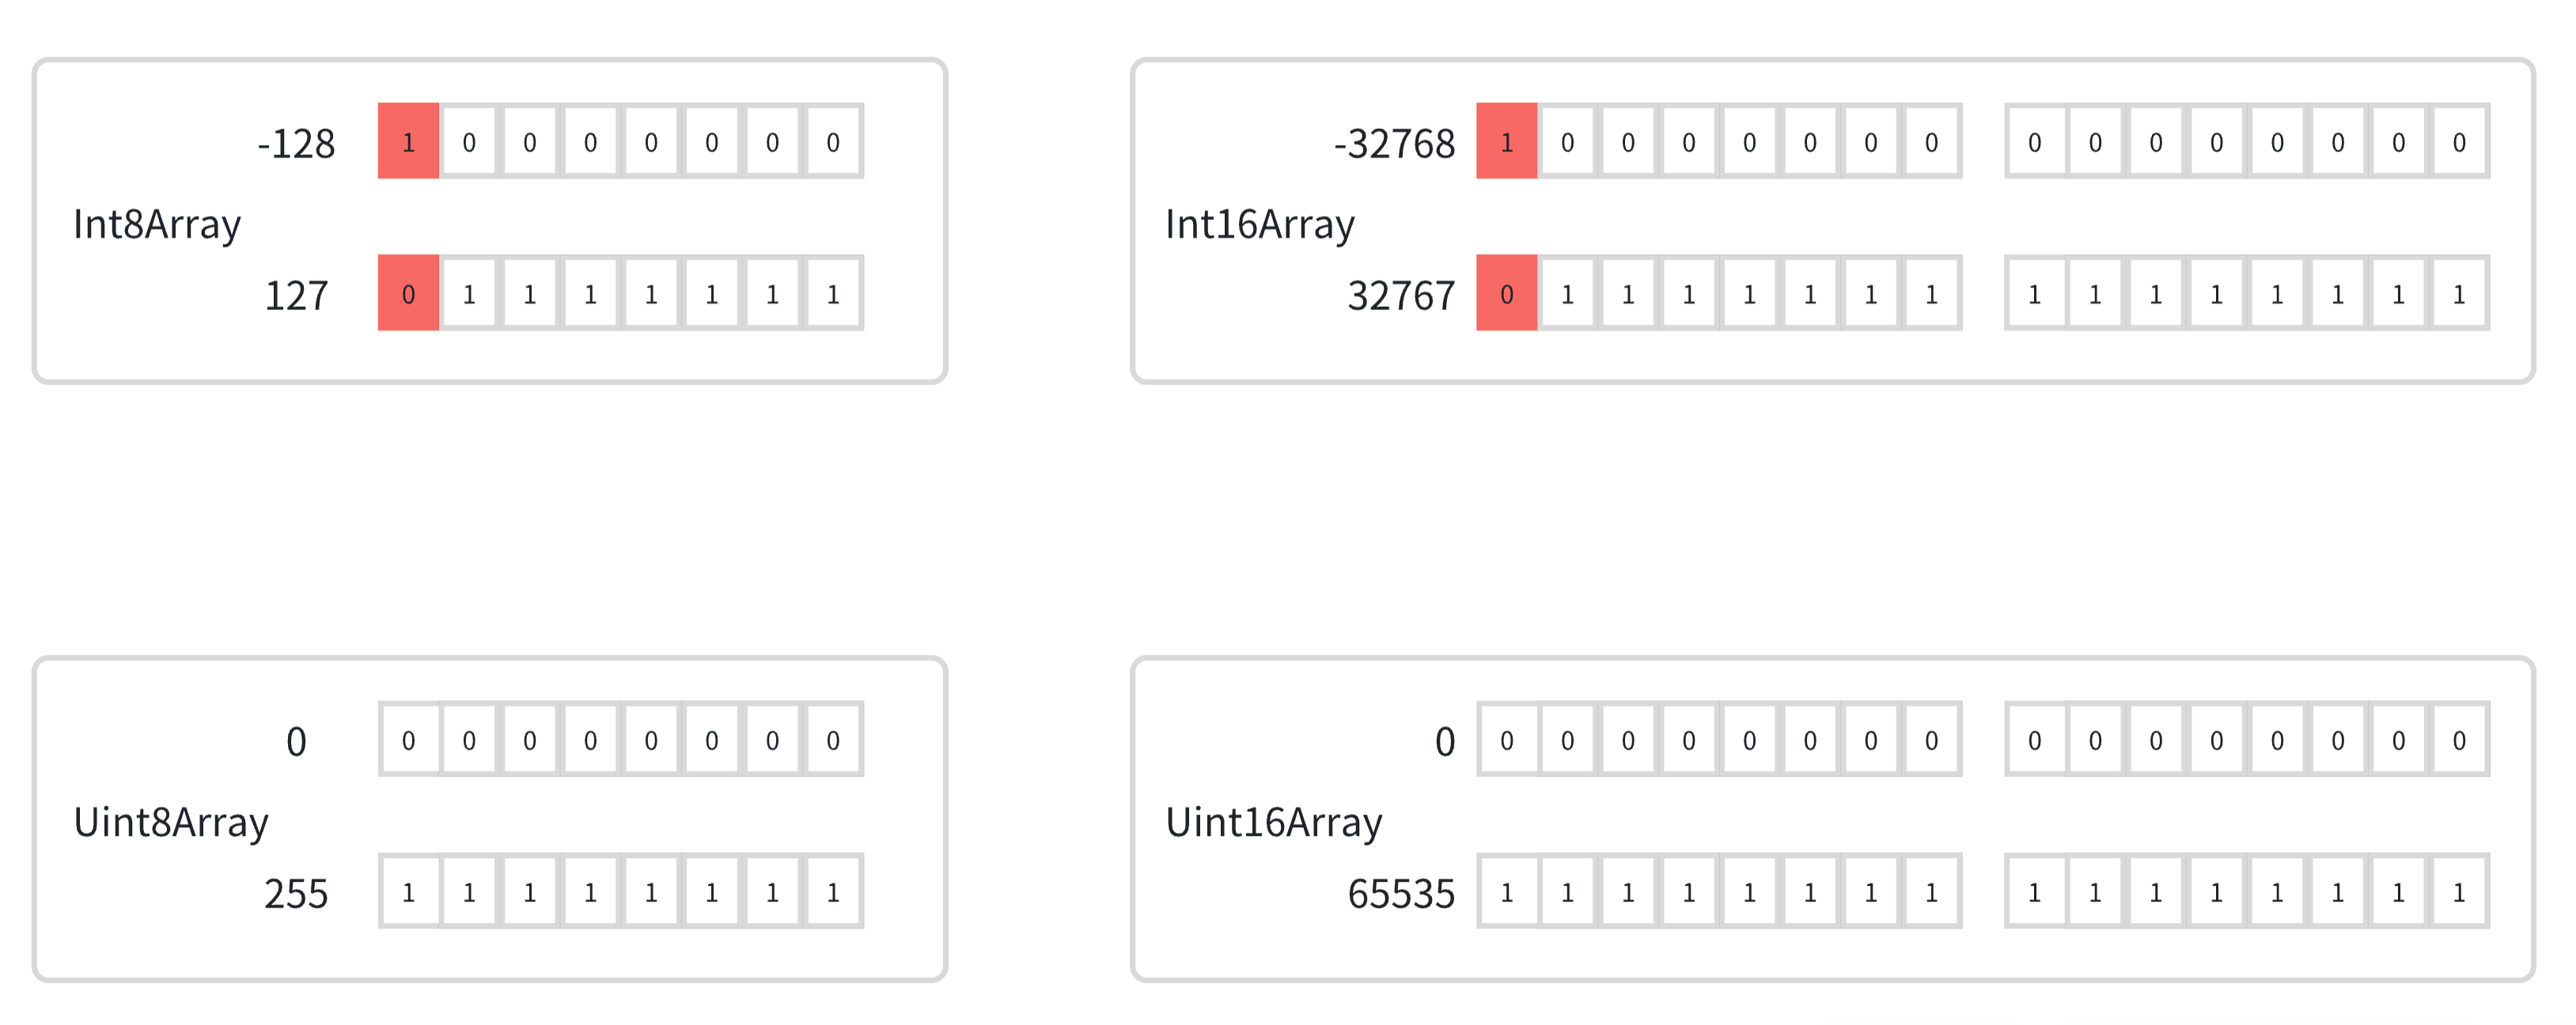
上面,我们可以知道 Int8Array 单个元素占据 1 个字节,8 个二进制位。
而 Int16Array 单个元素占据 2 个字节,16 个二进制位。
那么,假设创建了一个 8 个字节长度的 ArrayBuffer 转化成 Int16Array,那么,Int16Array 是多少呢?有兴趣可以试试。
const buffer = new ArrayBuffer(8);

console.log(buffer.byteLength); // 8
const int8Array = new Int8Array(buffer);
console.log(int8Array.length); // 8
const int16Array = new Int16Array(buffer);
console.log(int16Array.length); // ?const buffer = new ArrayBuffer(8);
console.log(buffer.byteLength); // 8
const int8Array = new Int8Array(buffer);
console.log(int8Array.length); // 8
const int16Array = new Int16Array(buffer);
console.log(int16Array.length); // ?另外,所有 TypedArray 都有一个 buffer 属性,用于返回其底层的 ArrayBuffer。
const buffer = new ArrayBuffer(8);
const uint8Array = new Uint8Array(buffer);
console.log(uint8Array.buffer === buffer); // true
const buffer = new ArrayBuffer(8);
const uint8Array = new Uint8Array(buffer);
console.log(uint8Array.buffer === buffer); // trueDataView
DataView 视图是一个可以从二进制 ArrayBuffer 对象中读写多种数值类型的底层接口,相对于 TypedArray 的固定格式要更加灵活些。
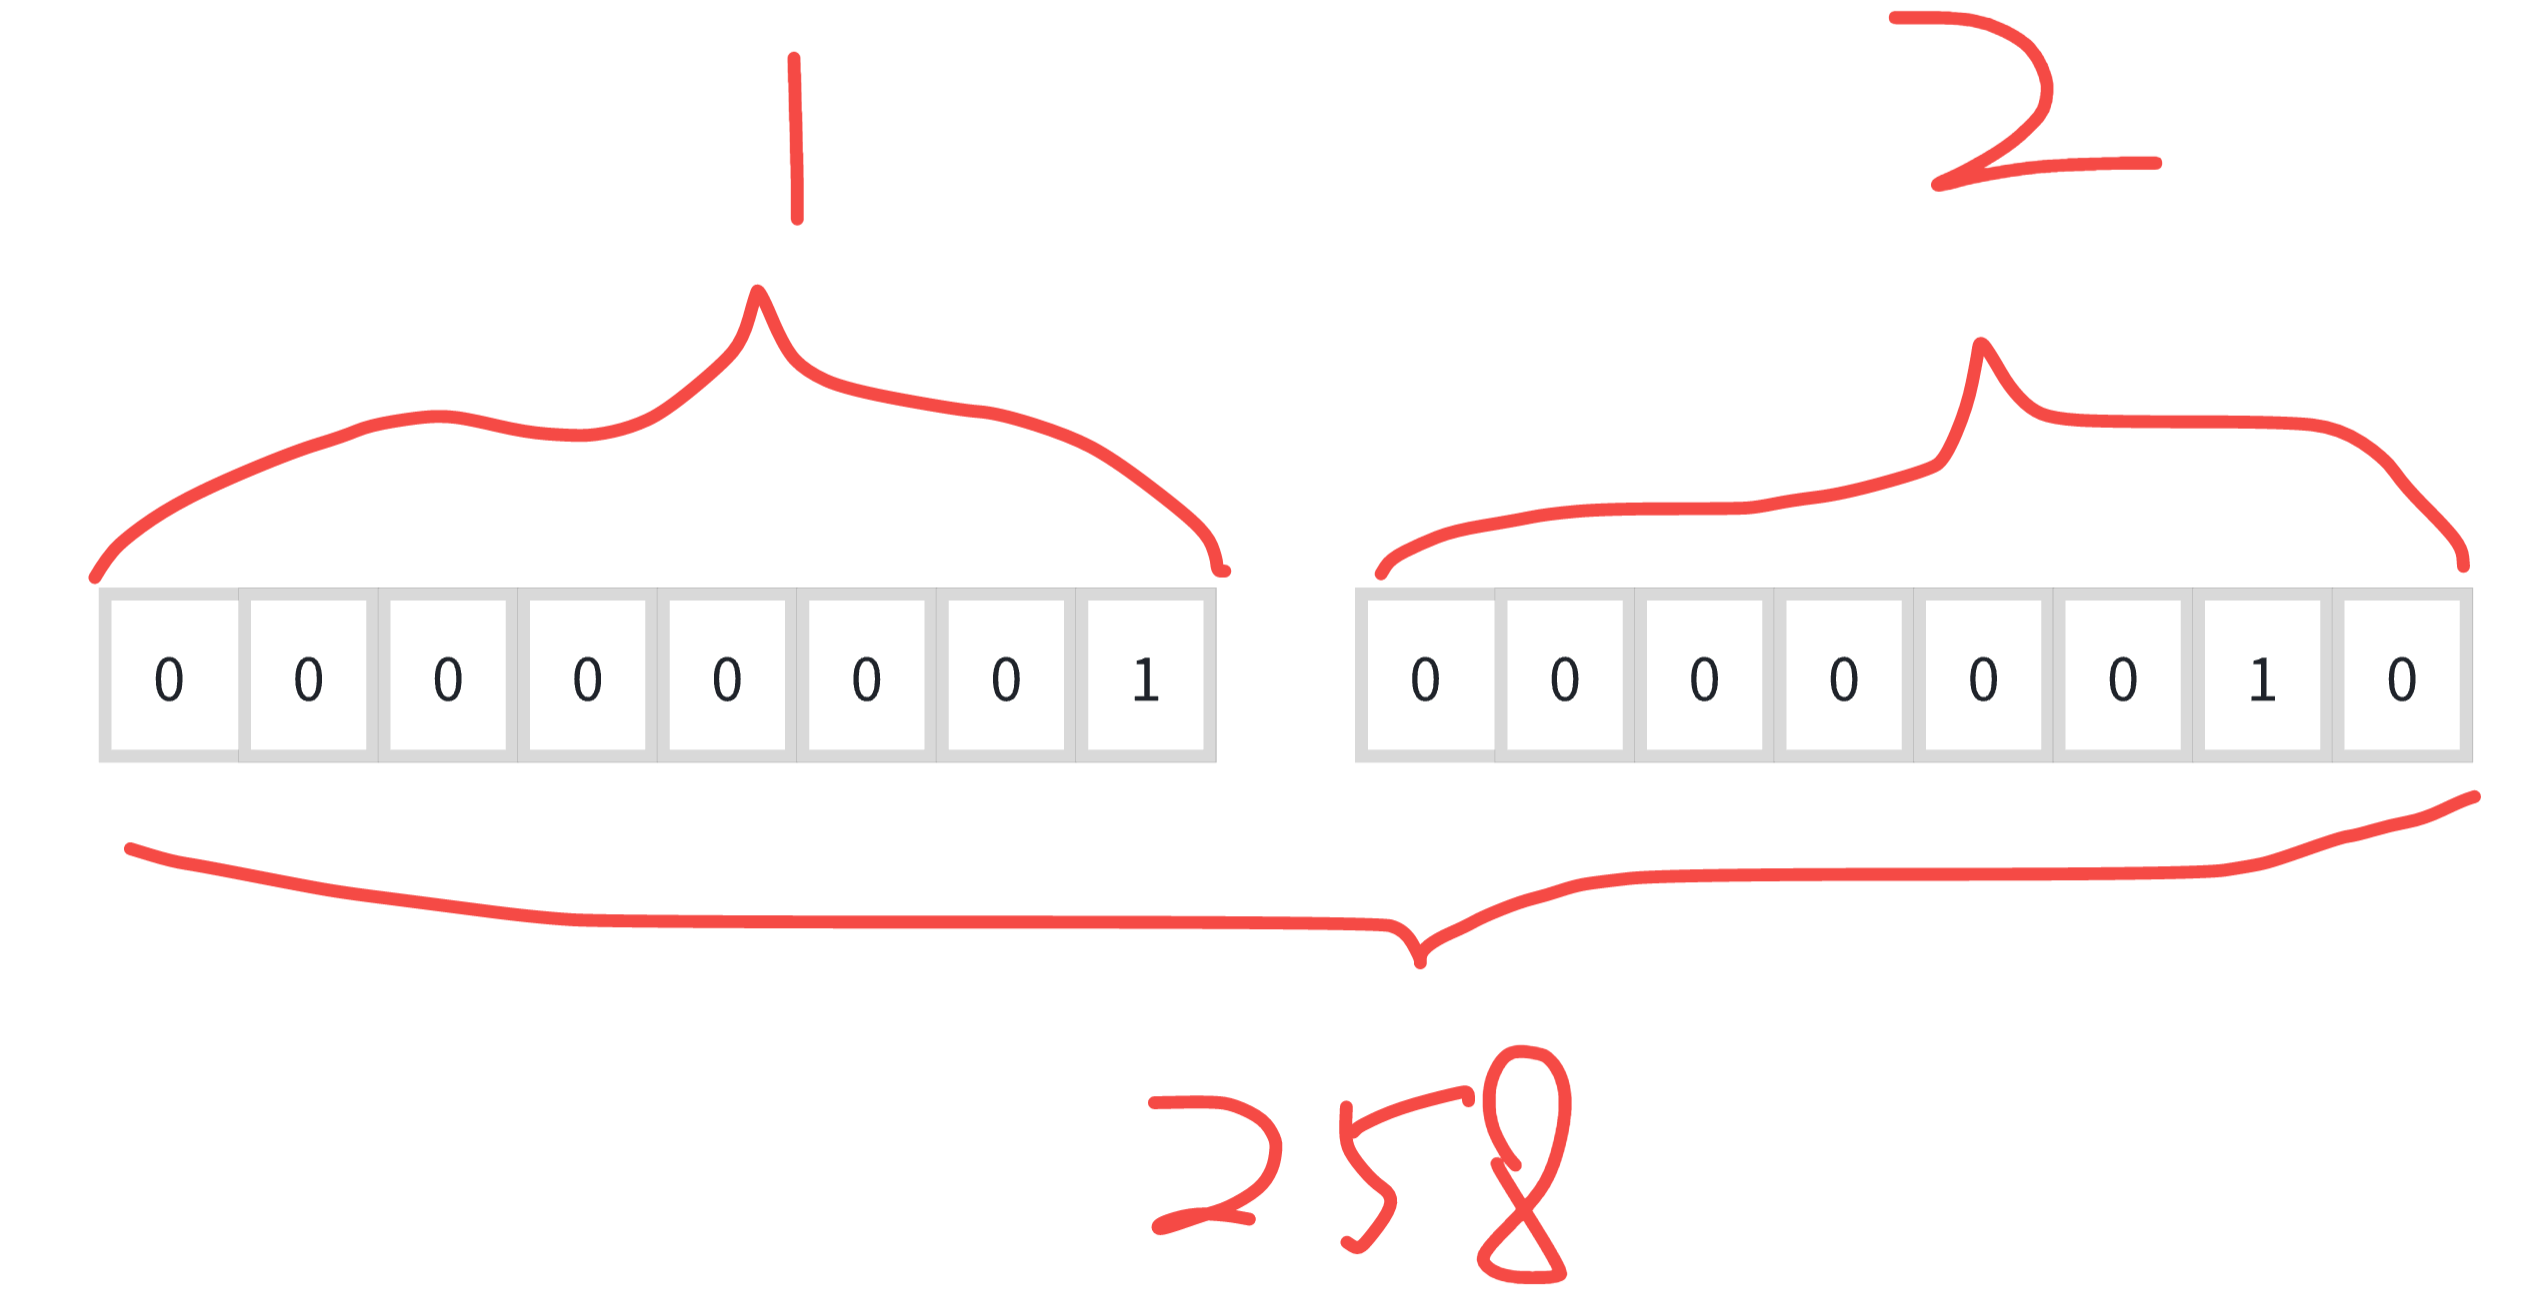
setInt8(offset, value) 方法,可以从偏移量位置开始存储一个 8 个 bit 的数(存一个字节)
getInt8(offset) 则是从 偏移量位置读取一个 8 个 bit 的数。
const buffer = new ArrayBuffer(2); // 2 个字节的 ArrayBuffer
console.log(buffer.byteLength); // 2
const dataView = new DataView(buffer);
dataView.setInt(0, 1);
dataView.setInt(1, 2);

console.log(dataView.getInt8(0)); // 1
console.log(dataView.getInt8(1)); // 2
console.log(dataView.getInt16(0)); // 258, 取 2 个字节的整数
console.log(dataView.buffer === buffer); // true
const buffer = new ArrayBuffer(2); // 2 个字节的 ArrayBuffer
console.log(buffer.byteLength); // 2
const dataView = new DataView(buffer);
dataView.setInt(0, 1);
dataView.setInt(1, 2);
console.log(dataView.getInt8(0)); // 1
console.log(dataView.getInt8(1)); // 2
console.log(dataView.getInt16(0)); // 258, 取 2 个字节的整数
console.log(dataView.buffer === buffer); // trueBlob
Blob 是不可变的、原始数据的类文件对象
常见的,可以使用 new Blob(array, type) 创建 Blob 对象,这里的 array 可以是 string[]、ArrayBuffer、ArrayBufferView、Blob
const jsonData = {
    name: "Hello world!",
}
const blob = new Blob([JSON.stringify(jsonData)], { type: "application/json" });
console.log(blob);

function readBlob(blob, type) {
    const { promise, resolve } = Promise.withResolvers();
    let reader = new FileReader();

    reader.onload = function (event) {
        resolve(event.target.result);
    }

    switch (type) {
        case "ArrayBuffer":
            reader.readAsArrayBuffer(blob);
            break;
        case "DataURL":
            reader.readAsDataURL(blob); // Base64 字符串
            break;
        case "Text":
            reader.readAsText(blob, 'utf-8');
            break;
    }

    return promise;
}

function toAscii(uint8Array) {
    let ascii = '';
    for (let i = 0; i < uint8Array.length; i++) {
        // 转换为ASCII字符并拼接
        ascii += String.fromCharCode(uint8Array[i]);
    }

    return ascii;
}

// function toAsciiPro(uint8Array) {
//     // 使用 TextDecoder 正确处理 UTF-8 编码(包括中文)
//     const decoder = new TextDecoder('utf-8');
//     return decoder.decode(uint8Array);
// }


readBlob(blob, "ArrayBuffer").then(result => {
    console.log(`-------- ArrayBuffer start --------`);
    console.log(result);
    console.log(`-------- ArrayBuffer end --------`);
    const uint8Array = new Uint8Array(result); // uint8Array 的元素是 8 位 bit 的无符号整数(最大 255)
    console.log(`-------- uint8Array start --------`);
    console.log(uint8Array);
    console.log(`-------- uint8Array end --------`);
    console.log(`-------- toAscii start --------`);
    console.log(toAscii(uint8Array));
    console.log(`-------- toAscii end --------`);
})

readBlob(blob, "DataURL").then(result => {
    console.log(`DataURL`, result);
})

readBlob(blob, "Text").then(result => {
    console.log(`Text`, result);
})
const jsonData = {
name: "Hello world!",
}
const blob = new Blob([JSON.stringify(jsonData)], { type: "application/json" });
console.log(blob);
function readBlob(blob, type) {
const { promise, resolve } = Promise.withResolvers();
let reader = new FileReader();
reader.onload = function (event) {
resolve(event.target.result);
}
switch (type) {
case "ArrayBuffer":
reader.readAsArrayBuffer(blob);
break;
case "DataURL":
reader.readAsDataURL(blob); // Base64 字符串
break;
case "Text":
reader.readAsText(blob, 'utf-8');
break;
}
return promise;
}
function toAscii(uint8Array) {
let ascii = '';
for (let i = 0; i < uint8Array.length; i++) {
// 转换为ASCII字符并拼接
ascii += String.fromCharCode(uint8Array[i]);
}
return ascii;
}
// function toAsciiPro(uint8Array) {
// // 使用 TextDecoder 正确处理 UTF-8 编码(包括中文)
// const decoder = new TextDecoder('utf-8');
// return decoder.decode(uint8Array);
// }
readBlob(blob, "ArrayBuffer").then(result => {
console.log(`-------- ArrayBuffer start --------`);
console.log(result);
console.log(`-------- ArrayBuffer end --------`);
const uint8Array = new Uint8Array(result); // uint8Array 的元素是 8 位 bit 的无符号整数(最大 255)
console.log(`-------- uint8Array start --------`);
console.log(uint8Array);
console.log(`-------- uint8Array end --------`);
console.log(`-------- toAscii start --------`);
console.log(toAscii(uint8Array));
console.log(`-------- toAscii end --------`);
})
readBlob(blob, "DataURL").then(result => {
console.log(`DataURL`, result);
})
readBlob(blob, "Text").then(result => {
console.log(`Text`, result);
})输出打印时,当我们可以打开内存器查看 ArrayBuffer 的内存存储信息。
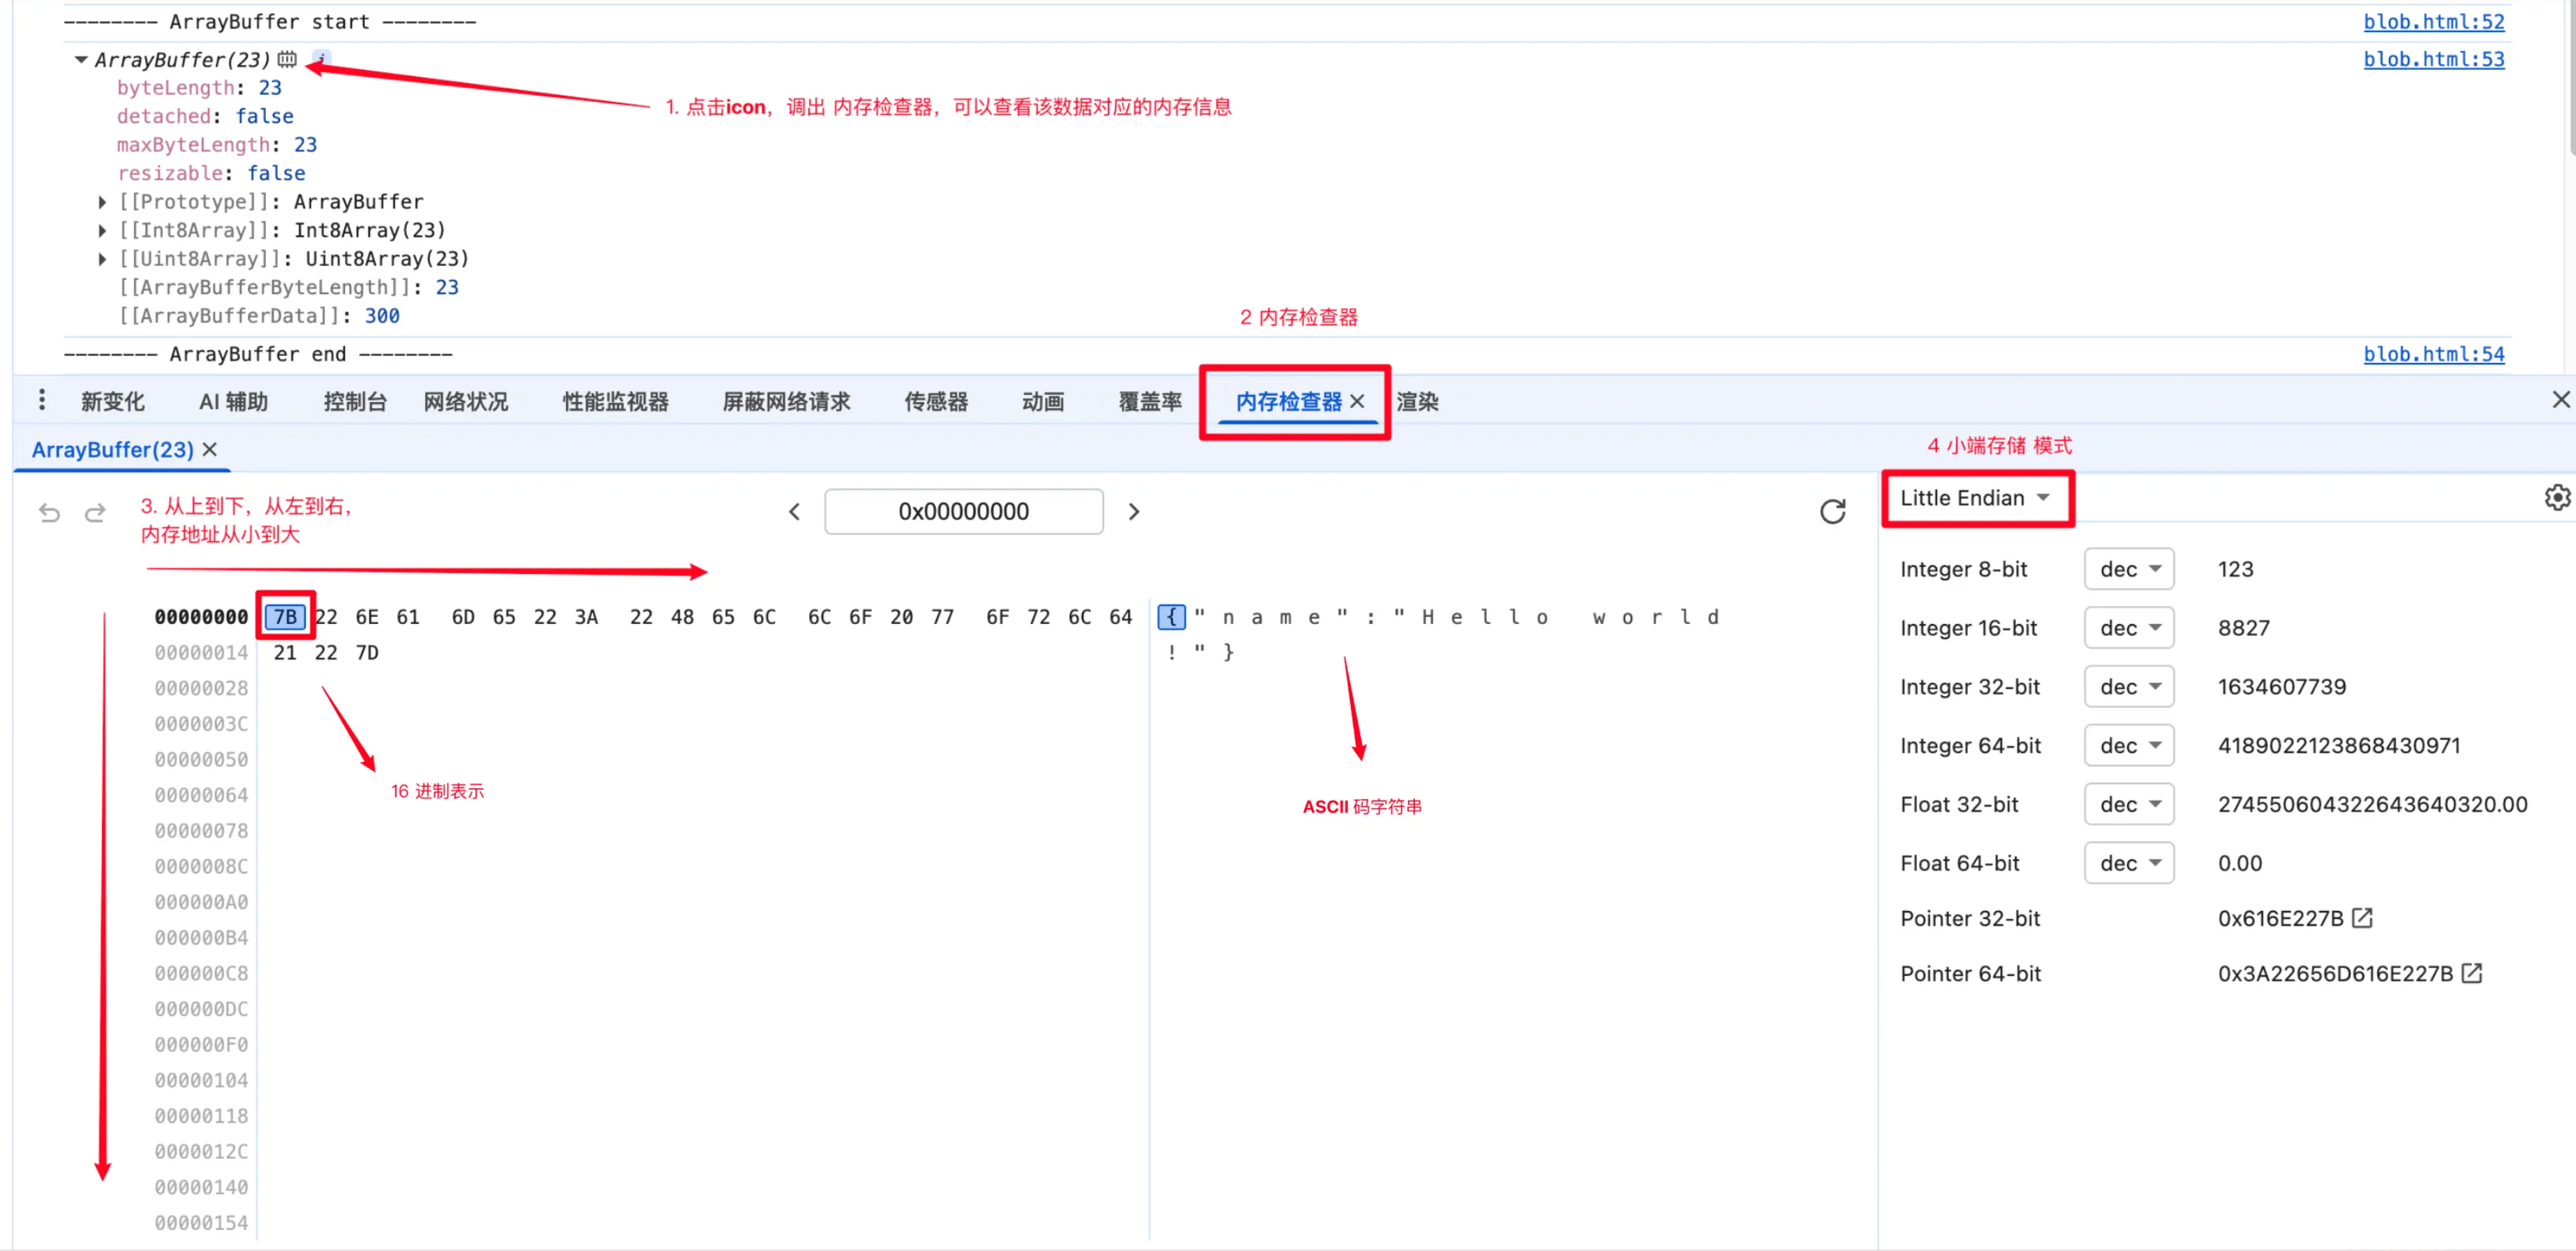
此时,我们发现内存地址存储的是 16 进制的数,将 16 进制转 ASCII 码的操作,便可以得到文件内容了。
function hexToAscii(hex) {
  // 移除可能存在的空格或0x前缀
  hex = hex.replace(/\s|0x/g, '');
  let ascii = '';

  // 每两位16进制数转换为一个ASCII字符
  for (let i = 0; i < hex.length; i += 2) {
    // 截取两位16进制数并转换为十进制
    const decimal = parseInt(hex.substr(i, 2), 16);
    // 转换为ASCII字符并拼接
    ascii += String.fromCharCode(decimal);
  }

  return ascii;
}

console.log(hexToAscii('7B226E616D65223A2268656C6C6F20776F726C6421227D')); // { "name": "hello world!" }
function hexToAscii(hex) {
// 移除可能存在的空格或0x前缀
hex = hex.replace(/\s|0x/g, '');
let ascii = '';
// 每两位16进制数转换为一个ASCII字符
for (let i = 0; i < hex.length; i += 2) {
// 截取两位16进制数并转换为十进制
const decimal = parseInt(hex.substr(i, 2), 16);
// 转换为ASCII字符并拼接
ascii += String.fromCharCode(decimal);
}
return ascii;
}
console.log(hexToAscii('7B226E616D65223A2268656C6C6F20776F726C6421227D')); // { "name": "hello world!" }通过前面的学习,我们知道 ArrayBuffer 是不可读写的,我们需要将 ArrayBuffer 转化为 TypedArray 对象或者 DataView 对象,然后进行读写操作。
因此,我们将 ArrayBuffer 转化成 Uint8Array 即8位无符号整数数组(数组中最大整数只能是255)。
因为 Uint8Array 的元素是十进制数,因此,我们需要不需要将 16 进制转十进制,直接将十进制数转 ASCII 码即可。
function toAscii(uint8Array) {
        let ascii = '';
        for (let i = 0; i < uint8Array.length; i++) {
            // 转换为ASCII字符并拼接
            ascii += String.fromCharCode(uint8Array[i]);
        }

        return ascii;
    }
    const uint8Array = new Uint8Array(result); // uint8Array 的元素是 8 位 bit 的无符号整数(最大 255)
    console.log(`-------- uint8Array start --------`);
    console.log(uint8Array);
    console.log(`-------- uint8Array end --------`);
    console.log(`-------- toAscii start --------`);
    console.log(toAscii(uint8Array));
    console.log(`-------- toAscii end --------`);
function toAscii(uint8Array) {
let ascii = '';
for (let i = 0; i < uint8Array.length; i++) {
// 转换为ASCII字符并拼接
ascii += String.fromCharCode(uint8Array[i]);
}
return ascii;
}
const uint8Array = new Uint8Array(result); // uint8Array 的元素是 8 位 bit 的无符号整数(最大 255)
console.log(`-------- uint8Array start --------`);
console.log(uint8Array);
console.log(`-------- uint8Array end --------`);
console.log(`-------- toAscii start --------`);
console.log(toAscii(uint8Array));
console.log(`-------- toAscii end --------`);似乎一切都在按我们的预期进行,但是,当我们尝试读取一个包含中文的文件时,我们会发现,读取到的内容是乱码。
const jsonData = {
    name: "Hello world!我是中文",
    }
    const blob = new Blob([JSON.stringify(jsonData)], { type: "application/json" });

    readBlob(blob, "ArrayBuffer").then(result => {
        console.log('-------- uint8Array start --------');
        const uint8Array = new Uint8Array(result); // uint8Array 的元素是 8 位 bit 的无符号整数(最大 255)
        console.log('-------- uint8Array end --------');
        console.log('-------- toAscii start --------');
        console.log(`toAscii--->`, toAscii(uint8Array)); // 整数转 ASCII 字符 { "name": "hello world!" }
        console.log('-------- toAscii end --------');
    })
const jsonData = {
name: "Hello world!我是中文",
}
const blob = new Blob([JSON.stringify(jsonData)], { type: "application/json" });
readBlob(blob, "ArrayBuffer").then(result => {
console.log('-------- uint8Array start --------');
const uint8Array = new Uint8Array(result); // uint8Array 的元素是 8 位 bit 的无符号整数(最大 255)
console.log('-------- uint8Array end --------');
console.log('-------- toAscii start --------');
console.log(`toAscii--->`, toAscii(uint8Array)); // 整数转 ASCII 字符 { "name": "hello world!" }
console.log('-------- toAscii end --------');
})
我们发现,读取到的内容是乱码,这是因为什么呢?
在解决乱码问题之前,我们需要先了解一些字符编码的知识。
标准ASCII字符集使用1个字节存储一个字符,首位是 0,总共可表示 128 个字符,只能存储英文、数字、符号等,对美国人来说完全够用。
但对于中文的话,ASCII 字符集无法表示,因此,我们需要使用 其他字符集 来表示中文。
Object URL
Object URL 是一种用于表示文件对象的 URL,可以用于在浏览器中显示文件内容。
<html>
<body>
 <button id="btn" onclick="download()">下载</button>
<script>
    function download() {
        const blob = new Blob([JSON.stringify({ name: "Hello world!" })], { type: "application/json" });
        const url = URL.createObjectURL(blob); // 使用 URL.createObjectURL 创建一个临时的 URL,这个 URL 指向 blob 对象
        const a = document.createElement("a");
        a.href = url;
        a.download = "test.json";
        a.dispatchEvent(new MouseEvent("click")); // 模拟点击下载
        URL.revokeObjectURL(url); // 释放内存
    }
</script>
</body>
</html><html>
<body>
<button id="btn" onclick="download()">下载</button>
<script>
function download() {
const blob = new Blob([JSON.stringify({ name: "Hello world!" })], { type: "application/json" });
const url = URL.createObjectURL(blob); // 使用 URL.createObjectURL 创建一个临时的 URL,这个 URL 指向 blob 对象
const a = document.createElement("a");
a.href = url;
a.download = "test.json";
a.dispatchEvent(new MouseEvent("click")); // 模拟点击下载
URL.revokeObjectURL(url); // 释放内存
}
</script>
</body>
</html>download 属性指定文件名需要文件和网址同域名才能生效,如果是第三方网址(例如 CDN)这里的 download 属性是不生效的
基于此,当我们需要需要指定文件名称的时候,常常会通过 Blob 转化成 Object URL 来实现。
备注:URL.createObjectURL 在 Service Worker 中不可用,因为它有可能导致内存泄漏。
Base64
<!DOCTYPE html>
<html lang="en">

<head>
    <meta charset="UTF-8">
    <meta name="viewport" content="width=device-width, initial-scale=1.0">
    <title>文件显示图片案例</title>
</head>

<body>
    <img id="img" src="" alt="">
    <input id="file" type="file" accept="image/*">
    <script>
        const img = document.getElementById("img");
        const uploadImage = document.getElementById("file");
        uploadImage.addEventListener("change", (e) => {
            const file = e.target.files[0];
            const reader = new FileReader();
            reader.onload = (e) => {
                img.src = e.target.result; // 图片的base64字符串
            };
            reader.readAsDataURL(file);
        });
    </script>
</body>

</html><!DOCTYPE html>
<html lang="en">
<head>
<meta charset="UTF-8">
<meta name="viewport" content="width=device-width, initial-scale=1.0">
<title>文件显示图片案例</title>
</head>
<body>
<img id="img" src="" alt="">
<input id="file" type="file" accept="image/*">
<script>
const img = document.getElementById("img");
const uploadImage = document.getElementById("file");
uploadImage.addEventListener("change", (e) => {
const file = e.target.files[0];
const reader = new FileReader();
reader.onload = (e) => {
img.src = e.target.result; // 图片的base64字符串
};
reader.readAsDataURL(file);
});
</script>
</body>
</html>base64 转 Blob
const text = 'Hello world!'; // 12 个字符长度
const base64 = btoa(text);
console.log(base64); // SGVsbG8gd29ybGQ= 16 个字符长度
const blob = new Blob([atob(base64)], { type: 'text/plain' });
console.log(blob);
const text = 'Hello world!'; // 12 个字符长度
const base64 = btoa(text);
console.log(base64); // SGVsbG8gd29ybGQ= 16 个字符长度
const blob = new Blob([atob(base64)], { type: 'text/plain' });
console.log(blob);为什么 base64 比 原来的字符串更大?
- 原字符串(如 ASCII 字符)每个字符占 8 个二进制位(1 字节)。
- base64 将原字符串转换为 ASCII 字符串,每个字符占 6 个二进制位(1 字节)。
为了让 8 位的原数据适配 6 位的编码单位,必须补充二进制位,导致总位数增加。
直观例子
- 原字符串(3 字节,如 “ABC”):二进制是 01000001 01000010 01000011(24 位)。
- base64 编码后:按 6 位拆分为 010000 010100 001001 000011,对应 4 个字符 “QUJD”(4 字节)。
- 膨胀比例:(4-3)/3 ≈ 33%,这是 base64 编码的固定最小膨胀比例。